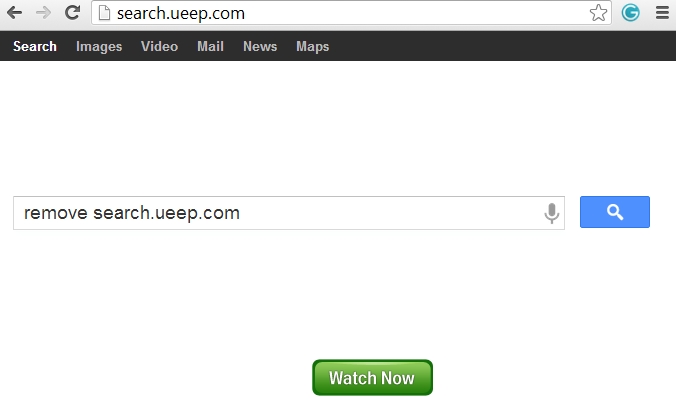
Search.ueep.com is a new browser hijacker that has already attacked many systems and now continues its misleading practice of targeting browsers of many PCs and installing itself through bundled software downloads. Use this guide to remove search.ueep.com as the start page of your browser.
What is the purpose of sites like search.ueep.com? The answer to this question is quite predictable and understandable. The reason why people develop such browser hijackers is their non-stopping lust to earn as much money as possible. So, via search.ueep.com they advertise a lot of goods and services. Many companies pay big bucks to them for promoting various produces through search.ueep.com. The objective of the authors of this hijacker is to implant this add-on to as many browsers as possible. Both legal and illegal ways are used by adware makers for making it possible.
Illegal way of search.ueep.com installation into browser implies infiltration of this add-on to browsers without asking for user’s approval. This may take place through participation of a special trojan horse, a virus that is responsible for bringing this hijacker into computer without asking user’s opinion on this matter. Then, of course, it is quite unexpected for users to encounter their search redirected permanently via search.ueep.com. Another way this hijacker may implant your PC is quite legal, by the way. And this method is the one that is most often used for installation of this add-on. In the next paragraph we’ll try to demonstrate how this infiltration works on a specific machine.
Internet is full of free applications (freeware) which can be easily downloaded and installed online. We actually do not doubt the fact that these applications may be useful for many users. Yet, the danger is that they may be often bundled with various other tools, browser add-ons and similar applications that can be considered as extras. This is the exact technique used for search.ueep.com installation. When you install certain freeware program you will be prompted to install many other additional utilities (like search.ueep.com search engine), various other system tools, utilities, optimizers, etc. The setup wizard even clearly mentions that you will be installing these extras together with the initial software of your choice. Yet, your failure to read the setup instructions carefully leads to such undesirable consequences. The occurrence of search.ueep.com being integrated into your browser is your fault in this case. You should have been more careful to read the instructions of the installation wizard, making sure to remove all other unwanted extras.
How to avoid your browser from being hijacked by search.ueep.com? First of all, always choose the option of custom software installation (with freeware or shareware applications downloaded online). Make sure you avoid standard (default) software installs, since this is the reason why you have so many other unwanted items installed as well. Read the instructions of the setup wizard carefully, remove all items which are not wanted by you. Finally, make sure you download applications from secure online resources which are trusted by many users. Avoid clicking the links that may be formalized in the form of online spam in social networks, spam emails, etc. Do not open and do not launch any suspicious attachments, like fake emails supposedly coming from DHL, UPS, USPS, Fedex, etc.
To get rid of search.ueep.com you will need to work for a while on your PC. You may choose some type of adware cleaner for this purpose, even though the mere scanning of your system with it might not be effective. What you should do is to implement certain manual steps first directing at removal of search.ueep.com from your browser, its start page, and getting rid of search.ueep.com as your default search engine. Please follow the guidelines below that will help you in this important matter. Again, please don’t hesitate to get in touch with us at any time of your preference if you experience any problems of dificulties uninstalling search.ueep.com.
General tips to get rid of search.ueep.com from various browsers.
Search.ueep.com removal from Internet Explorer.
- Go to “Tools“, select “Internet Options” panel.
- Click “General” tab.
- Delete search.ueep.com homepage link and set a new homepage link.
- Click “Settings” button in the “Search” area, open “Manage Add-ons” panel.
- Remove search.ueep.com, then close “Manage Add-ons” panel.
- Click “Apply” or “OK” on “Internet Options” panel to apply the changes.
Search.ueep.com removal from Mozilla Firefox.
- Open Mozilla Firefox.
- Go to “Firefox” button in the upper-left window corner, then select “Options” panel.
- Click “General” tab.
- Delete search.ueep.com homepage link and set a new homepage link.
- Go to “Firefox“, then select “Add-ons” and open “Add-ons Manager” panel.
- Click “Remove” button in the right of search.ueep.com.
- Choose “Manage Search Engines” in the search list.
- Remove search.ueep.com, then click “OK“.
- Restart Mozilla Firefox.
Search.ueep.com removal from Google Chrome.
- Open Google Chrome.
- Click “Customize and control Google Chrome” in the right-top of the page.
- Choose “Settings“, then click “Set pages” link to delete search.ueep.com homepage link. Then click “OK“.
- Click “Manage search engines”, delete search.ueep.com, then click “OK“.
- Via “Customize and control Google Chrome” go to “Tools“, select “Extensions” open “Extensions” panel.
- Remove “search.ueep.com“.
- Restart Google Chrome.
Restoring shortcuts of amended browsers.
- Find the shortcut of the browser (Internet Explorer, Mozilla Firefox, Google Chrome, Opera, etc.) in all locations of the computer, including but not limited to the desktop.
- Right click and find the “Option“.
- Delete search.ueep.com in “Target” of the tab “Shortcut“.
Additional and detailed guidelines to fix search.ueep.com browser redirection issue:
Lists of recommended steps to fix browser redirection problem:
- Remove all adware, browser hijackers and other unwanted programs through the Control Panel of your computer.
- Scan your system with powerful antivirus program.
- Check the Local Area Network (LAN) settings of your system.
- Check if DNS settings have been amended by browser hijacker.
- Check browser add-ons. Remove all unknown or suspicions add-ons detected (enabled).
- Checking Windows HOSTS file contents
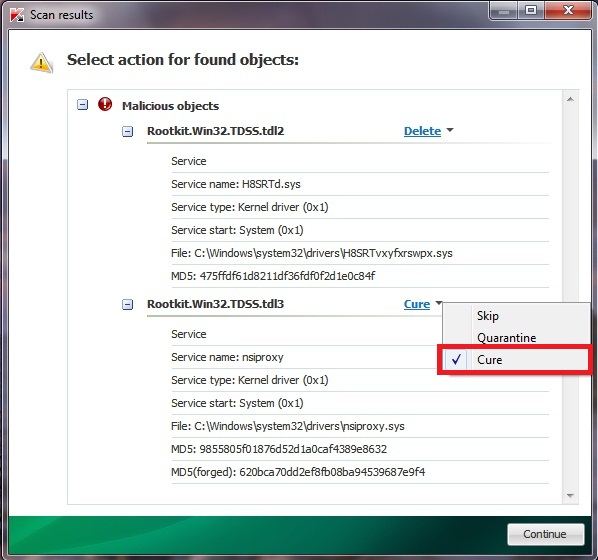
- Scan your computer with Kaspersky’s TDSS Killer (TDSSKiller) to get rid of malware that belongs to Rootkit.Win32.TDSS family.
- Consider using CCleaner to remove all undesirable system/temp files and browser cache.
- Consider running adware-cleaning applications.
- Restoring desktop shortcuts of hijacked browsers.
- Reset your Router to the factory default settings.
Step #1. Removing adware and browser hijackers through the Control Panel of your PC.
It is of primary importance to first get rid of all adware programs and browser hijackers through Add/Remove Programs section of your Control Panel (when using Windows XP), or through Uninstall a program section of Control Panel in Windows Vista, Windows 7 and Windows 8). For this purpose please refer to the Start Menu. Choose Control Panel, and then go to Add/Remove Programs. Likewise, when using Windows Vista, Windows 7 or Windows 8, select Control Panel and choose Uninstall a Program.

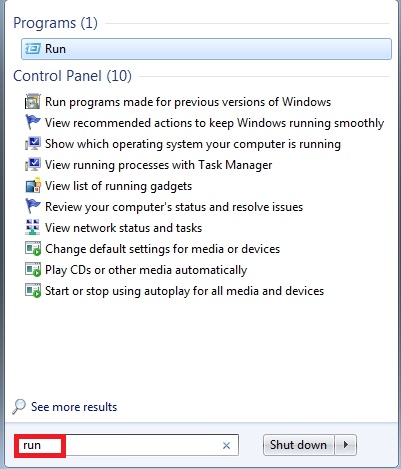
Now, with Windows 8 things are a little bit different. What you should do is just direct the mouse pointer to the right corner of the screen, and then select Search from the list, and search for “Control Panel“.

In the respective section of Search window, type “Control Panel“, and you will see the search results as follows:

So, after you’ve opened the sections Add/Remove or Uninstall a Program, carefully browse through the contents of presently installed applications and get rid of particular adware or browser hijacker, toolbar, search bar or anything else that has the name similar to that site through which your browser redirects your search. Keep in mind that if such program is in the list of installed programs, then it appeared there because of your direct participation in its installation process. You may actually click “Installed programs” and even sorts these installed applications by date. When you find anything suspicious that might cause browser redirection, select this application and click Remove. When using Windows Vista, Windows 7 or Windows 8, choose Uninstall in the upper part of the window. Once the program is successfully removed make sure you close the Control Panel window.
Step #2. Scanning computer with effective malware removal tool.
There are many working and reliable anti-virus programs these days. The degree of their effectiveness depends on various factors, primarily on how often their anti-malware databases are updated in order to effectively tackle all virus alterations and modifications. The majority of viruses in the cyber world today don’t last long in their initial shape. They get regularly amended by their developers in order not to be tracked (detected) by security applications. So, you should be very selective when considering security application for your PC. You might choose several programs, not just one. Make sure that you have the kind of security application that has the powerful module of online (real-time) protection against all contemporary threats and infections. We recommend you to choose the program that we display in the right-upper section of this blog. We in particular recommend running Plumbytes Anti-Malware that can be downloaded below.

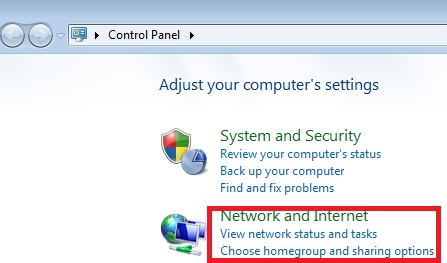
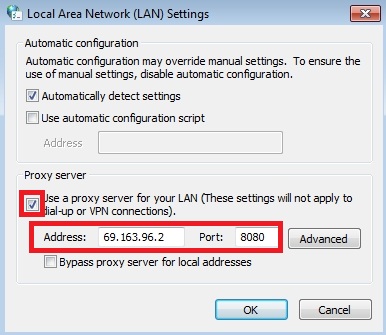
Step #3. Checking the Local Area Network (LAN) settings.
- Go to “Start” Menu and again select “Control Panel“.
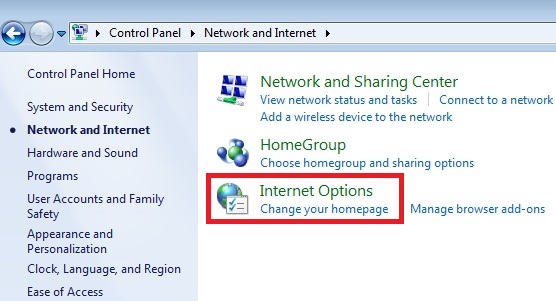
- Choose “Network and Internet“.
- Choose “Internet Options“.
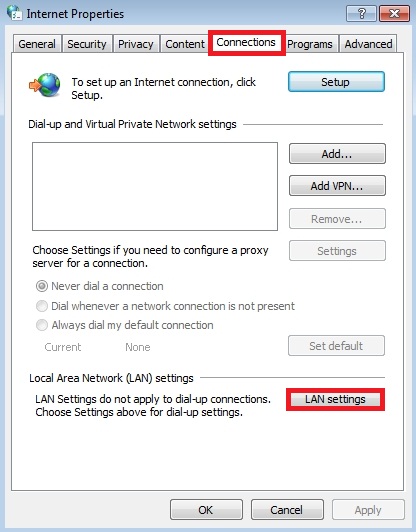
- Go to “Connections” tab, afterwards click “LAN settings” button.
- Remove (uncheck) the checkbox under “Proxy server” option and click OK.
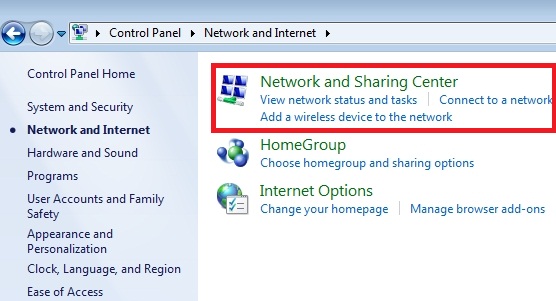
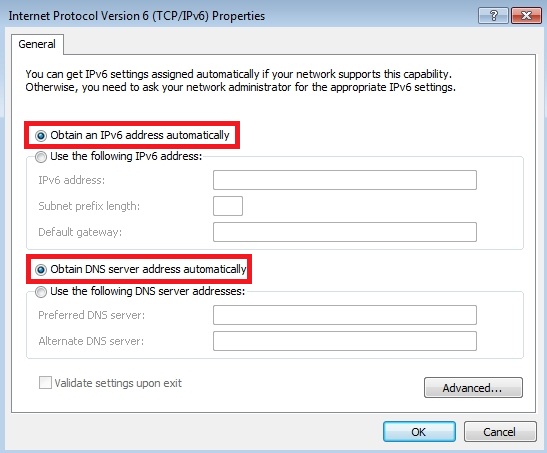
Step #4. Checking DNS settings.
- Go to “Start” Menu and refer to “Control Panel“.
- Choose “Network and Internet“.
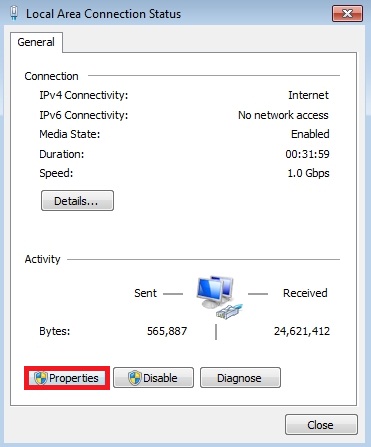
- Go to “Network and Sharing Center”.
- Select “Local Area Connection”.
- Choose “Properties”.
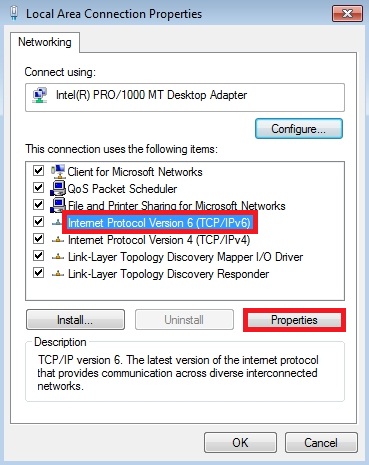
- Choose “Internet Protocol Version 6 (TCP/IP V6)” and select “Properties”.
- Select “Obtain DNS server address automatically” and click OK.

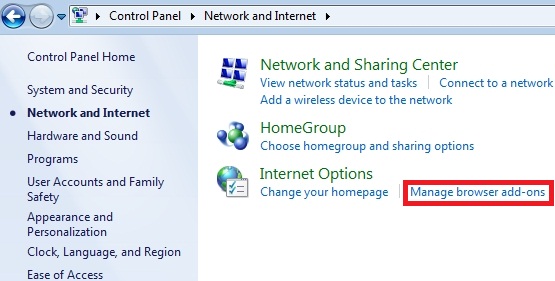
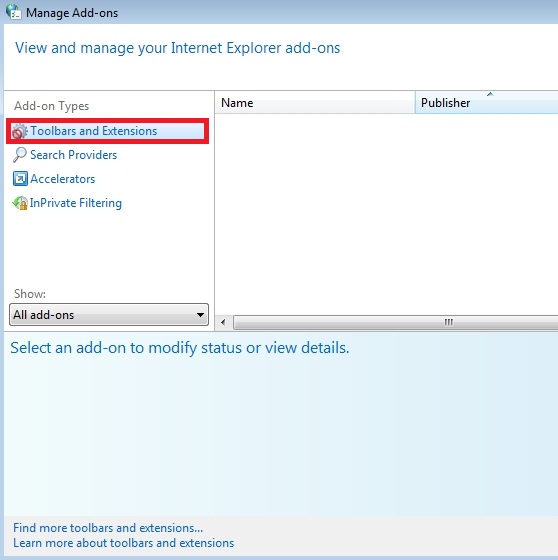
Step #5. Checking browser add-ons. Removal of all add-ons associated with search.ueep.com hijacker.
- Go to “Start” Menu and direct your mouse pointer towards “Control Panel“.
- Choose “Network and Internet“.
- In the section “Internet Options” choose “Manage browser add-ons“.
- Get rid of any Toolbars and add-ons related to search.ueep.com.
Important! For more information on managing browser add-ons please go to this guide for additional information on managing add-ons and extensions depending on the type of your default browser – https://www.system-tips.net/managing-browser-add-ons-to-fix-search-engine-redirection-problem/ .
Step #6. Checking Windows HOSTS file contents
- Go to: C:\WINDOWS\\system32\\drivers\\etc.
- Double-click “hosts” file to open it. Select the option to open it using Notepad.
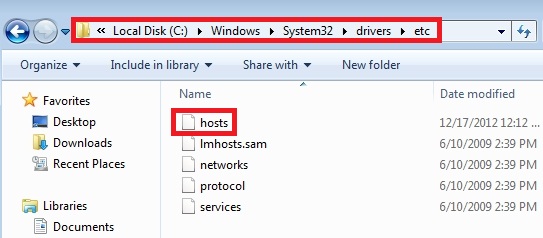
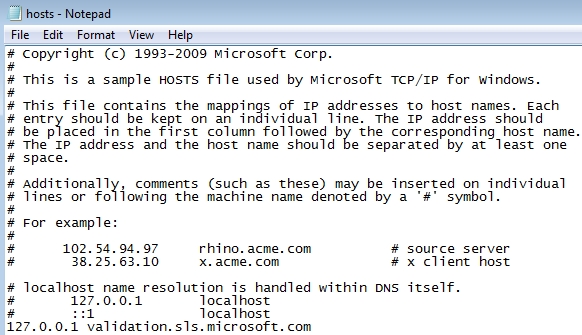
li>The “hosts” file must look the same as in the image below. There should be just one line: 127.0.0.1 localhost in Windows XP and 127.0.0.1 localhost ::1 in Windows Vista/Seven. If there are more, then remove them and apply changes.
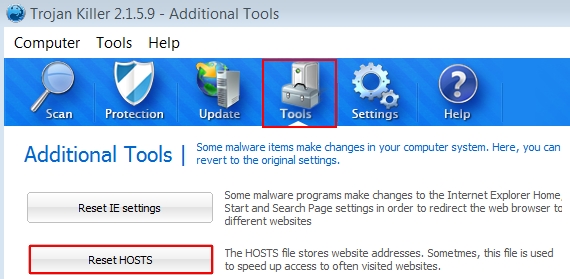
Important! You may also choose the feature to reset your HOSTS file using the Tool of Plumbytes Anti-Malware as shown at the image below:
Step #7. Scanning with Kaspersky’s TDSS Killer (free application).
- Download and run TDSS Killer from this link.
- Wait for the scan and disinfection process to be completed. Shut down all applications and hit “Y” key to reboot your system.
Step #8. Using CCleaner.
CCleaner is the application that can be easily googled and thus downloaded. When running it, keep in mind that it will clean the entire “Temp” directory of your computer, so if you have anything important in it please first save the data you need into other locations.
Step #9. Running adware-cleaning applications.
This option is also recommended. There are many working and effective automatic solutions that might be helpful to you when dealing with browser redirection issues. Again, Google will point you in the right direction to find the adware-cleaning program of your preference.
Step #10. Cleaning shortcuts of browsers that have been hijacked.
This step applies only to certain browser hijackers which are extremely severe. However, it is strongly recommended that you perform this important step. So, search for your browser shortcut depending on where it is located – on Desktop, in Taskbar or in Start Menu. Now, right-click it and select Properties:
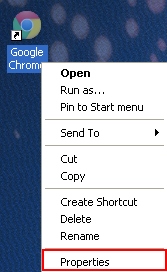
Click Shortcut tab and get rid of any name of the site through which search redirection occurs from the Target field and click OK to apply changes. Generally, there should be only the path to the executable file of your browser, nothing else. See how this is represented on the example of Google Chrome browser:

Step #11. Resetting Router to factory default settings.
At this point we should emphasize that resetting the router to the factory default settings is the option to which you should adhere only if other tricks above didn’t work. So, this recommendation should only be followed if in spite of all the above-mentioned recommendations you still have the redirect virus on your machine. Then you should flush DNS cache:
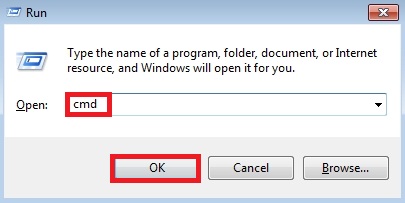
- Click “Start” and in the open space write down “run” This surely applies to Windows Vista and Windows 7 operating systems. With Windows XP you may fine “Run…” once you click “Start” menu option. With Windows 8 you may direct your mouse pointer towards the right section of your desktop until the menu comes up with “Search” tab. This is where you may look for Run command.
- Type “cmd” without quotation marks.
- In a new window please type “ipconfig /flushdns” without quotation marks and press Enter.

We hope this guide has helped you removing search.ueep.com from your computer that surely cause a tremendous load of problems for our brains. In spite of the fact it is annoying, it also makes your systems more and more vulnerable to further attacks of malwares. So, you’ve surely made a good decision to remove it off your computer. Keep in mind that there are various modifications and names of browser hijackers. Some of them are quite simple to remove, whereas others require more time to be deleted. If you have any difficulties getting rid of them, simply let us know. We’ll do all our best to assist you the best we can. Again, true comments are always welcome, so why don’t you drop a line to share what you think about this guide and whether you benefited from it? If this tutorial has helped you, share this information with other people so that they would know how to deal with such serious problems as the issues of browser redirection. Good luck!

I tried this as well as many other suggestions and nothing worked. The problem is finding the file and all the components. Finally I did a system restore to 2 days before everything fell apart and all is back to normal.
select “Extensions” open “strong>Extensions” panel.
what is strong>extension ?!