Webspeed adware is a new quite annoying application invading the majority of browsers today, including Google Chrome, Internet Explorer and Mozilla Firefox. The adware adds its own extension into these browsers and starts displaying a lot of intrusive ads, offers and deals titled as “brought by Webspeed”. These ads mainly come up when users go to various e-commerce websites where they can buy something online. The adware is capable of tracking user’s search preferences and then might even show certain relevant content through its ads. Yet, this is not the sign for you to believe in the good intentions of Webspeed. Its aim is quite different. The adware has in mind to trick you into purchasing various products it advertises. When you buy anything through them, those who stand behind this adware get paid. On the other hand, you will not be able to gain any benefit from Webspeed. The adware will most likely not even help you to save more funds while shopping online. Furthermore, there’s no guarantee that you will get what you’ve bought through these third-party websites associated to this adware.

Webspeed, just as all other programs classified as adware, comes into computers on the basis of being bundled by default with some other free programs. Very often this program may penetrate into computer through various spam links contained in junk emails you could receive. If clicked, the link would lead you to the installer of this adware. Yet, most likely the adware is integrated with the installers of certain free applications you might decide to make the part of your computer.
If you’re a users who prefers to deal with free software only, make sure you always know what exactly you’re going to install into your system in addition to the initial application of your choice. It is important to carefully read the EULAs (End User License Agreements) related to these free application. As a matter of fact, these documents generally clearly explain what other additional programs you will be suggested to install into your system. If you read about these unwanted extras, it’s a good and only logical idea to switch to the advanced or custom installation mode where you may uncheck these unwanted extras from being installed into your computer by default.
When users fail to be duly attentive they may end up installing Webspeed and a lot of other totally useless programs. This is the price they pay for their failure to be on guard during freeware installation. It is a bad idea to simply click on “Next” and “I agree” buttons during freeware installation. This may result in intrusion of many absolutely useless programs into your PC. In case you’ve seen your computer to be infected with Webspeed adware, it’s definitely the right time to exterminate it from your PC. We recommend that you follow this tutorial below explaining both automatic and manual ways of its elimination. The best solution though is to scan your system with Plumbytes Anti-Malware, which is a powerful antispyware program, and remove all the infections it finds (with its full registered version). Don’t forget to reset your browsers with it as explained below. In case you need more help on our part, please feel free to contact us without hesitation.
Software for Webspeed automatic removal:

Important steps for removal of Webspeed Ads:
- Downloading and installing the program.
- Scanning of your PC with it.
- Removal of all infections detected by it (with full registered version).
- Resetting your browser with Plumbytes Anti-Malware.
- Restarting your computer.
Similar Webspeed adware removal video:
Adware detailed removal instructions
Step 1. Uninstalling this adware from the Control Panel of your computer.
Instructions for Windows XP, Vista and 7 operating systems:
- Make sure that all your browsers infected with Webspeed adware are shut down (closed).
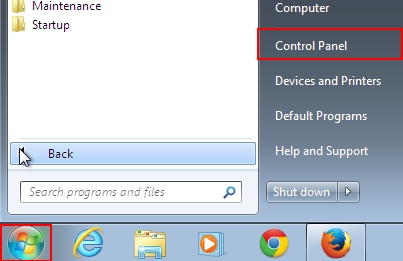
- Click “Start” and go to the “Control Panel“:
- In Windows XP click “Add or remove programs“:
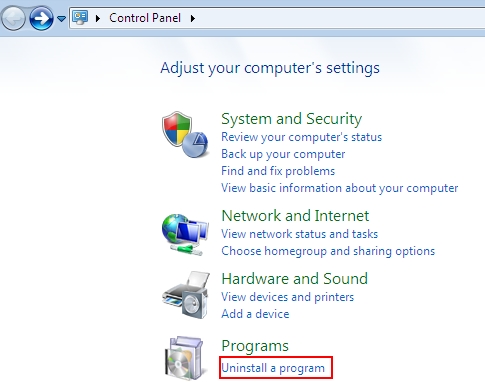
- In Windows Vista and 7 click “Uninstall a program“:
- Uninstall Webspeed adware. To do it, in Windows XP click “Remove” button related to it. In Windows Vista and 7 right-click this adware program with the PC mouse and click “Uninstall / Change“.

Instructions for Windows 8 operating system:
- Move the PC mouse towards the top right hot corner of Windows 8 screen, click “Search“:
- Type “Uninstall a program“, then click “Settings“:
- In the left menu that has come up select “Uninstall a program“:
- Uninstall this adware program. To do it, in Windows 8 right-click on Webspeed program with the PC mouse and click “Uninstall / Change“.


Step 2. Removing adware from the list of add-ons and extensions of your browser.
In addition to removal of adware from the Control Panel of your PC as explained above, you also need to remove this adware from the add-ons or extensions of your browser. Please follow this guide for managing browser add-ons and extensions for more detailed information. Remove any items related to this adware and other unwanted applications installed on your PC.
Step 3. Scanning your computer with reliable and effective security software for removal of all adware remnants.
- Download Plumbytes Anti-Malware through the download button above.
- Install the program and scan your computer with it.
- At the end of scan click “Apply” to remove all infections associated with this adware.
- Important! It is also necessary that you reset your browsers with Plumbytes Anti-Malware after this particular adware removal. Shut down all your available browsers now.
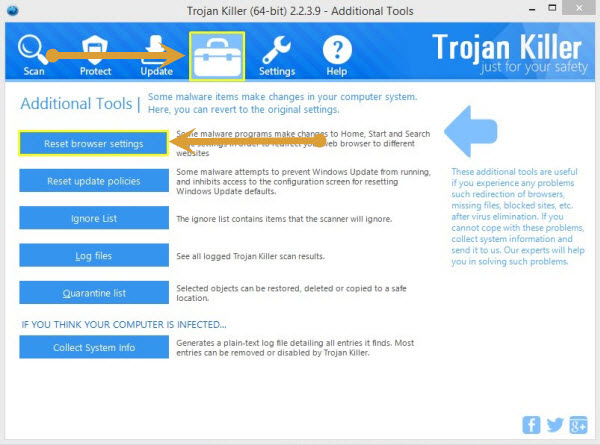
- In Plumbytes Anti-Malware click “Tools” tab and select “Reset browser settings“:
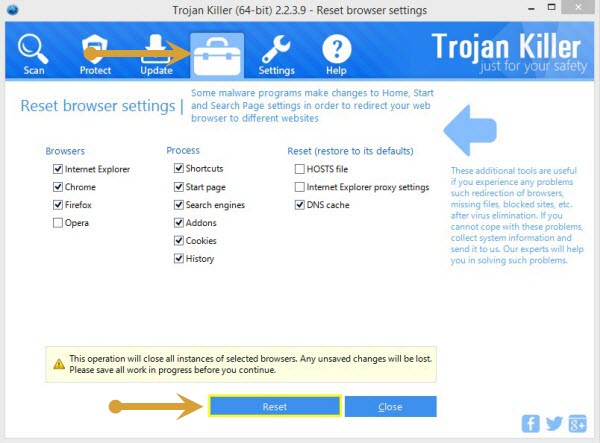
- Select which particular browsers you want to be reset and choose the reset options.
- Click on “Reset” button.
- You will receive the confirmation windows about browser settings reset successfully.
- Reboot your PC now.