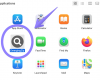
Sale Charger as an adware cannot render you help in finding better prices while shopping online. The application simply doesn’t have in mind to assist people as they shop online. Quite to the contrary, in fact. This program distracts you greatly when you attempt to visit certain commercial pages. Its ads will appear everywhere out of the blue, in different parts of your screen. Plus, you will see sudden pop-up windows originating without any logic. They just come up unexpectedly. This is all because of Sale Charger adware and its annoying performance in your computer.
This particular tutorial below will help you to remove Sale Charger adware either automatically or manually from your computer. First of all, note that this program is spread in the Internet along with other free applications. So, if you find it installed and active in your PC, first of all blame yourself for installing it. This is obviously your job to be careful when dealing with freeware. Make sure you always pay close attention to what exactly you’re going to make the part of your computer by default. Always pay attention to the information contained in the EULAs (End User License Agreements) of all free programs you’re going to install. And if you do read about some additional applications you don’t need, make sure you switch to the advanced or custom installation mode. This is the place where you may uncheck all third-party components from becoming the part of your computer by default.
Sale Charger adware removal menu:
- Recommended software to remove adware automatically.
- Resetting browser settings after automatic removal of adware.
- Video explaining how to reset your browsers affected by adware.
- Tutorial to remove adware manually.
- How to prevent your PC from being reinfected.
Sale Charger adware will essentially slow down your system after it gets installed by mistake. The adware consumes a lot of system resources due to high CPU usage. Also, you will notice that your browser permanently redirects you to random third-party sites of poor reputation, which often tell you to download and install a lot of junk applications into your system.
As you see, Sale Charger is a useless software you don’t need. Again, it is much easier to avoid its installation into the system in the first place, then to look for the information about its removal after the adware intrusion already took place. Please always read the supporting documentation related to all adware. Do not just click on “Next” or “I agree” buttons if you don’t know what you agree with.
To sum up, Sale Charger is an absolutely useless program for your system. We recommend you to get rid of it from your computer as soon as you identify its presence in your computer. To make it possible, please carefully follow the removal instructions set forth in the tutorial below. You will need to scan your system with a reliable antispyware program called Plumbytes Anti-Malware, remove all the infections it detects (with its full registered version) and to finally reset your browsers with its help. In case you need more assistance on our part, please feel free to contact us at any time of your choice.
Software to get rid of Sale Charger automatically.

Important milestones to delete Sale Charger Ads automatically are as follows:
- Downloading and installing the program.
- Scanning of your PC with it.
- Removal of all infections detected by it (with full registered version).
- Resetting your browser with Plumbytes Anti-Malware.
- Restarting your computer.
Detailed instructions to remove Sale Charger automatically.
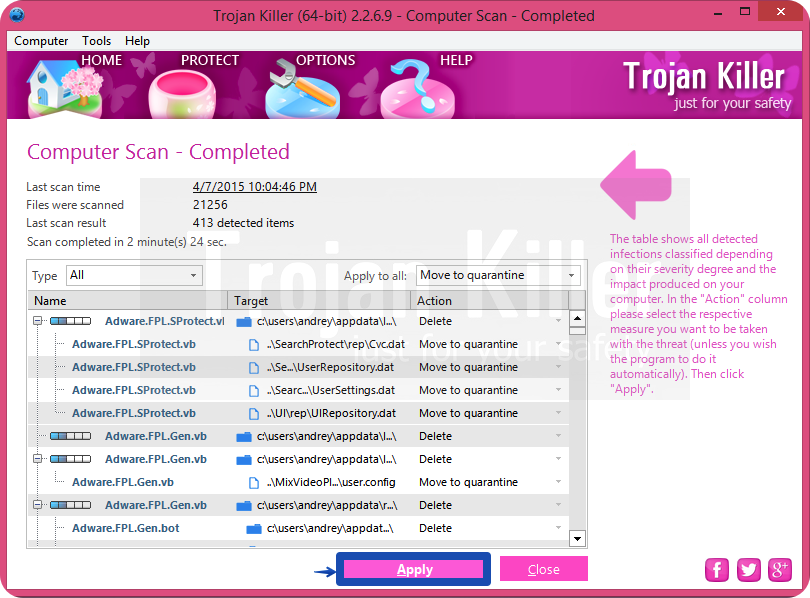
- Download Plumbytes Anti-Malware through the download button above.
- Install the program and scan your computer with it.
- At the end of scan click “Apply” to remove all infections associated with Sale Charger:
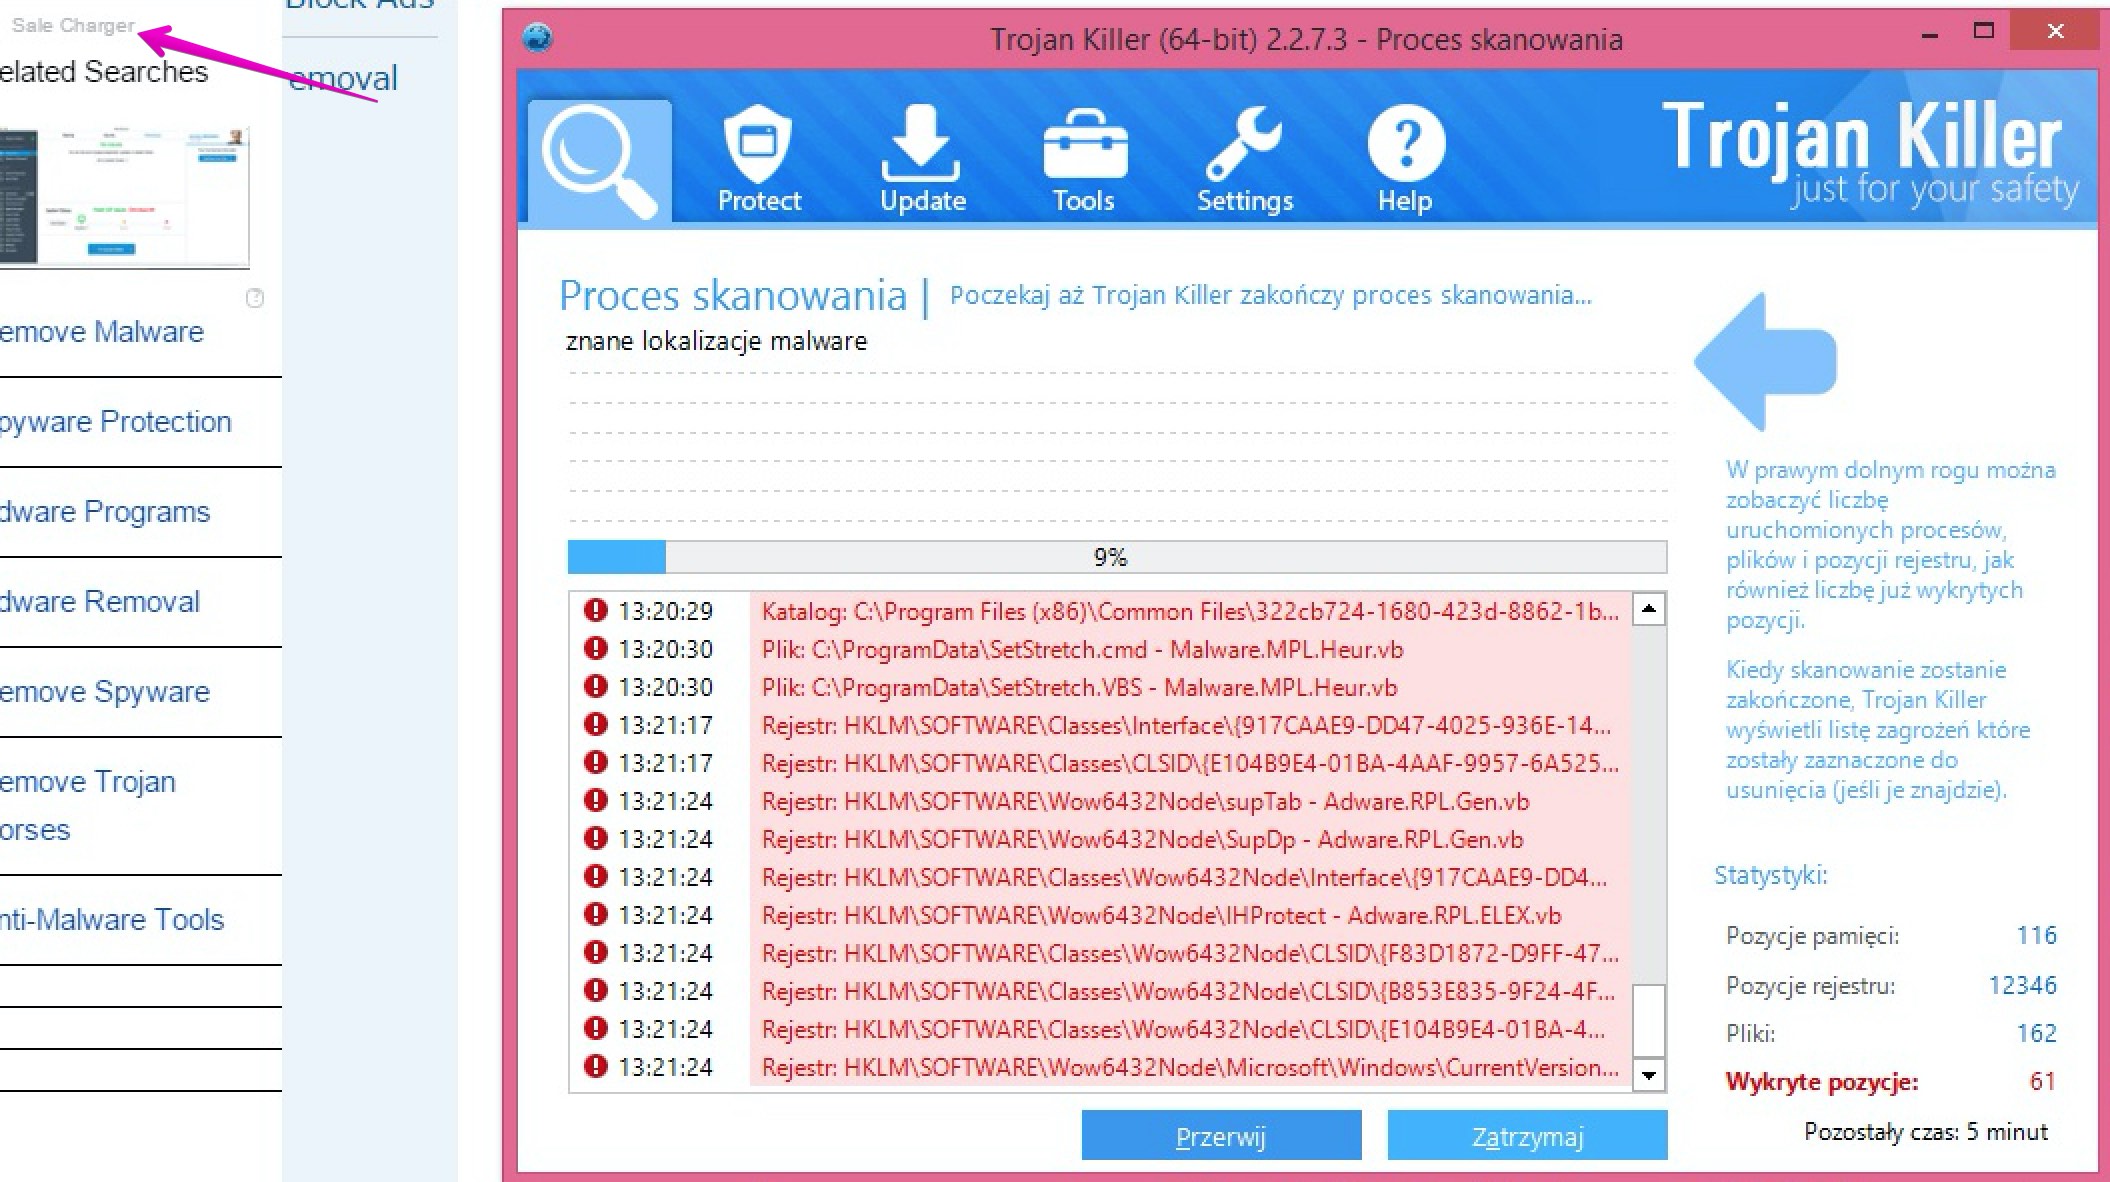
- Important! It is also necessary that you reset your browsers with Plumbytes Anti-Malware after this particular adware removal. Shut down all your available browsers now.
- In Plumbytes Anti-Malware click on “Tools” tab and select “Reset browser settings“:
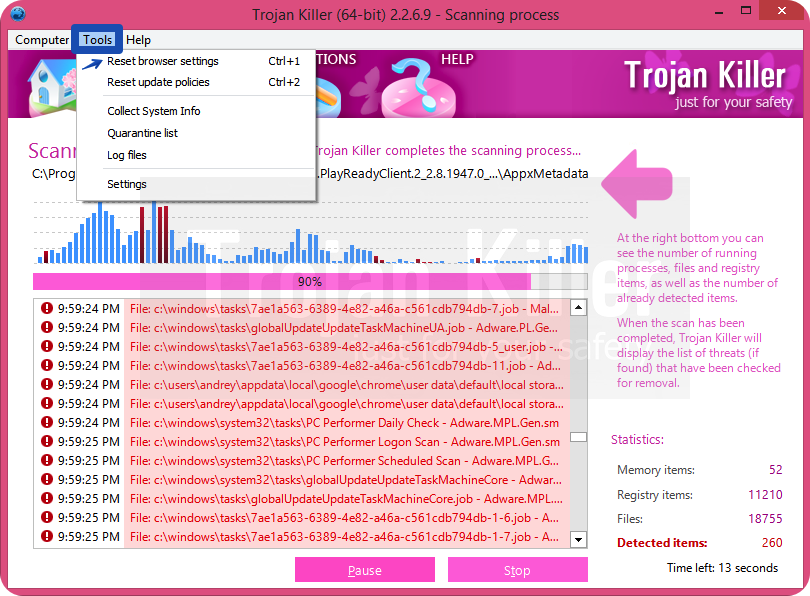
- Select which particular browsers you want to be reset and choose the reset options.
- Click on “Reset” button.
- You will receive the confirmation windows about browser settings reset successfully.
- Reboot your PC now.
Video guide explaining how to reset browsers altogether automatically with Plumbytes Anti-Malware:
Detailed removal instructions to uninstall Sale Charger manually
Step 1. Uninstalling this adware from the Control Panel of your computer.
- Make sure that all your browsers infected with Sale Charger adware are shut down (closed).
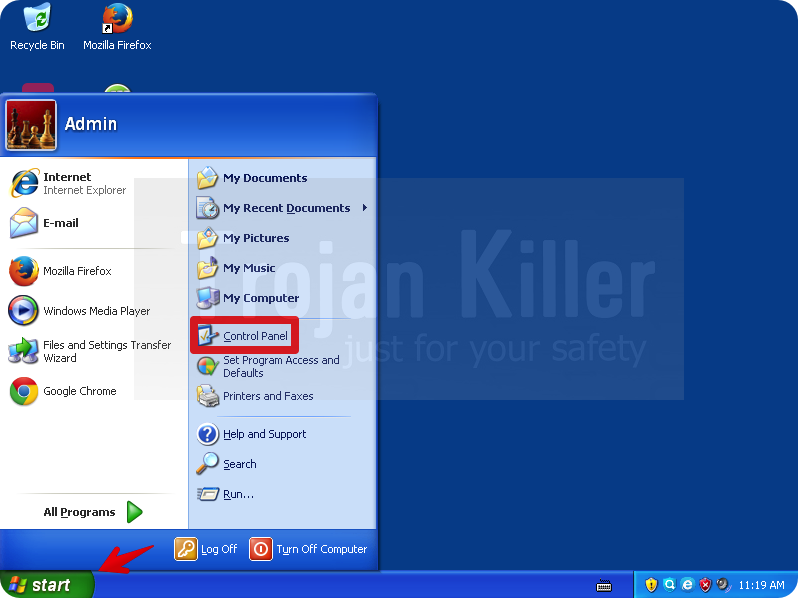
- Click on “Start” and go to the “Control Panel“:
- To access the Control Panel in Windows 8 operating system move the computer mouse towards the left bottom hot corner of Windows 8 screen and right-click on it. In Windows 8.1, simply right-click on the “Start” button. Then click on “Control Panel“:
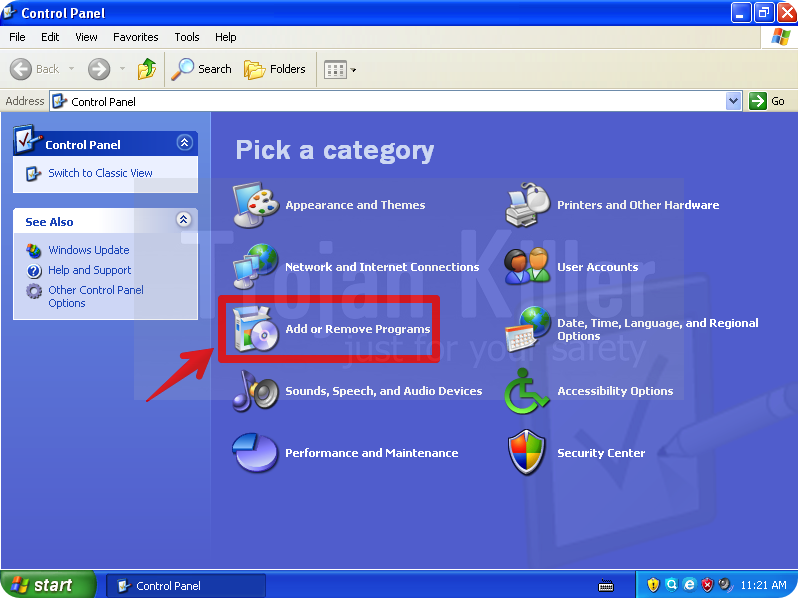
- In Windows XP click on “Add or remove programs“:
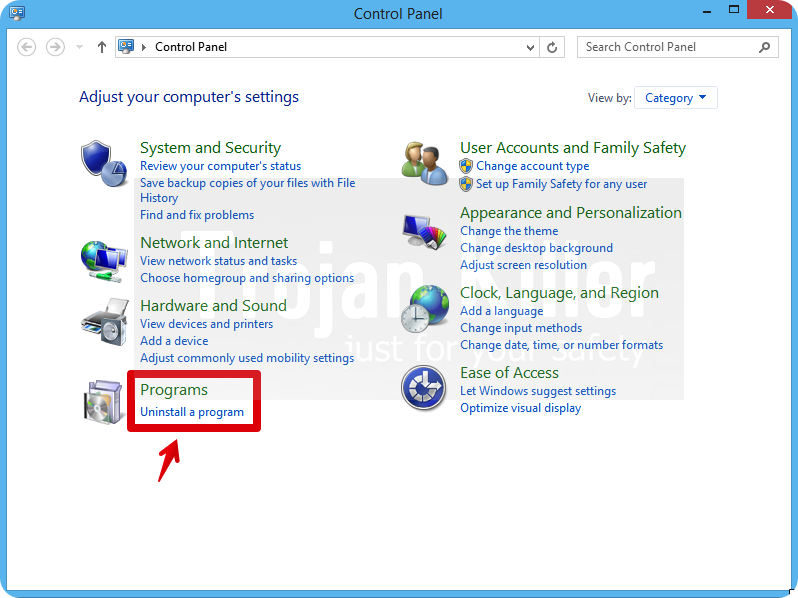
- In Windows Vista, 7, 8 and 8.1 click on “Uninstall a program“:
- Uninstall Sale Charger adware. To do it, in Windows XP click “Remove” button related to it. In Windows Vista, 7, 8 and 8.1 right-click on this adware with the PC mouse and click on “Uninstall / Change“.

Step 2. Removing adware from the list of add-ons and extensions of your browser.
In addition to removal of adware from the Control Panel of your PC as explained above, you also need to remove this adware from the add-ons or extensions of your browser. Please follow this guide for managing browser add-ons and extensions for more detailed information. Remove any items related to this adware and other unwanted applications installed on your PC.
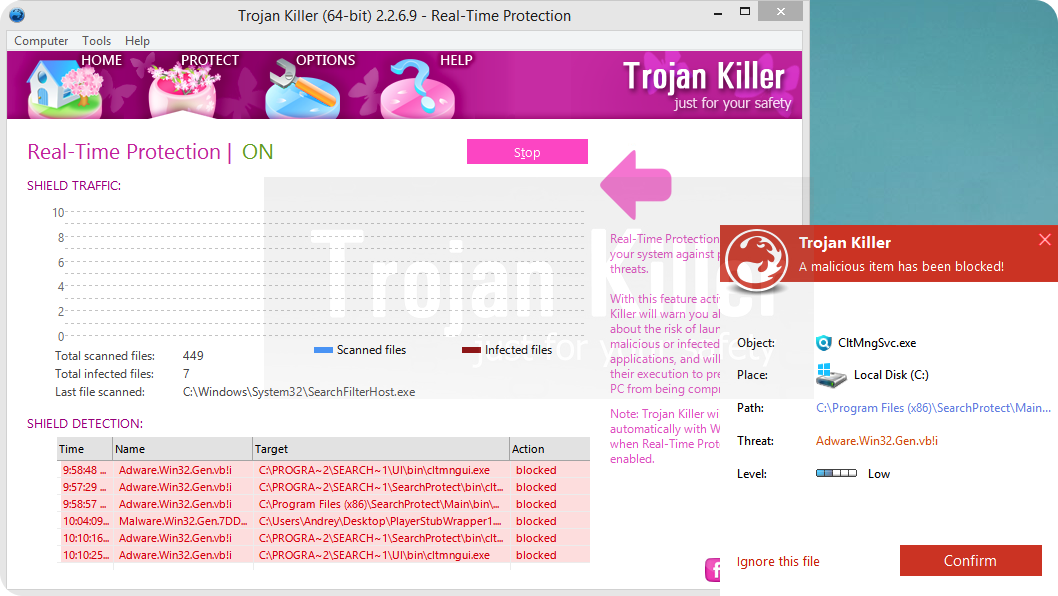
How to prevent your PC from being reinfected:
Plumbytes Anti-Malware offers a superb service to prevent malicious programs from being launched in your PC ahead of time. By default, this option is disabled once you install Anti-Malware. To enable the Real-Time Protection mode click on the “Protect” button and hit “Start” as explained below:
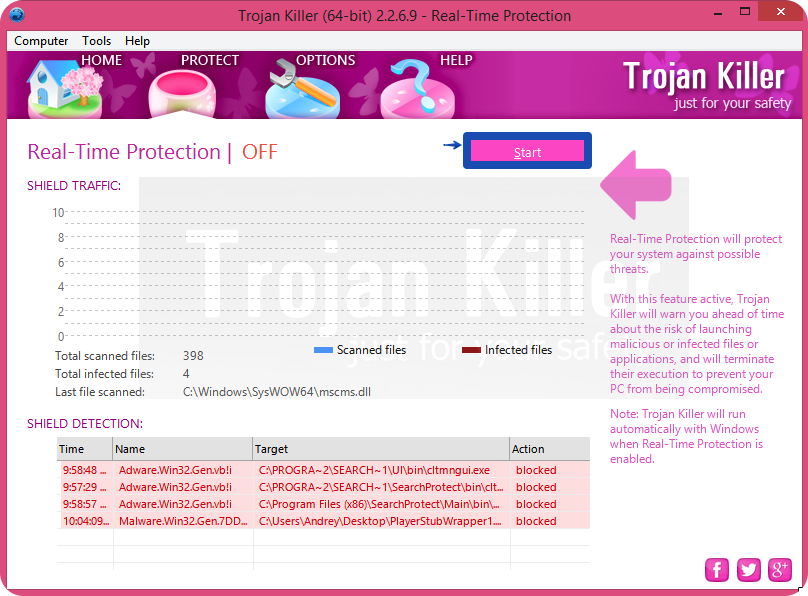
Once this option is enabled, your computer will be protected against all possible malware attacking your PC and attempting to execute (install) itself. You may click on the “Confirm” button to continue blocking this infected file from being executed, or you may ignore this warning and launch this file.