XTab is a special folder in the “Program Files” directory of your computer. If you use 64-bit operating system, this folder will be located in Program Files (x86) directory. This folder contains a lot of files and programs which are very malicious. In all cases they’re related to certain browser hijacker, which is also the part of your computer right now. Following this guide will help you to remove this entire XTab folder and viruses in it.
XTab system is used for protecting various browser hijackers from being removed by users. For example, WebsSearches, MyStartSearch, Omniboxes and iStart123 use XTab to prevent users from uninstalling these nasty hijackers. When users manually attempt to change the home pages of their hijacked browsers back to google.com, XTab will do its nasty mission of restoring webssearches.com, mystartsearch.com, omniboxes.com back to the settings of these browsers.
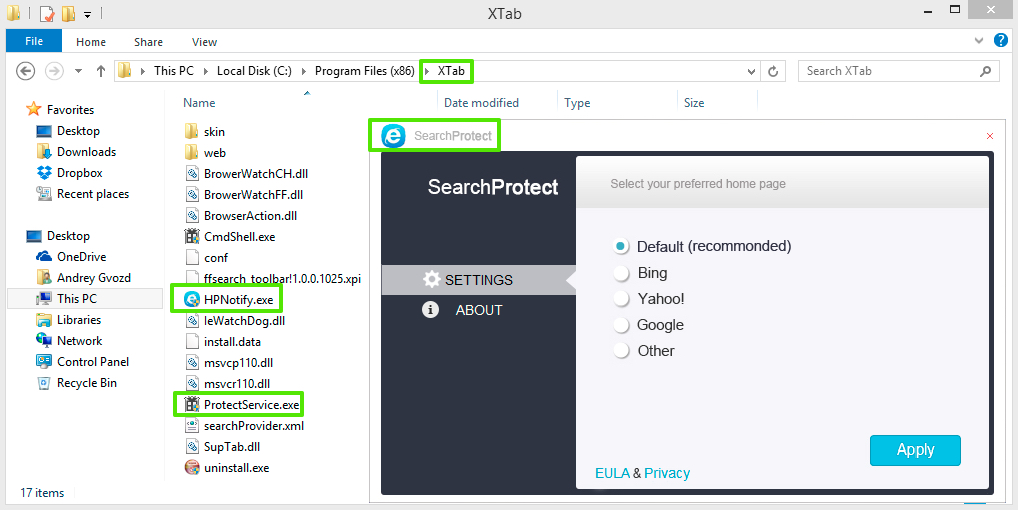
SupHPNot.exe (also known as HPNotify.exe) is the core component of XTab folder. When opening XTab you will most likely see HPNotify.exe, however, in Task Manager this application will be represented by SupHPNot.exe process. There will be some other additional processes, such as ProtectSvc.exe. It is related to ProtectService.exe application of XTab folder.
XTab folder can be removed when you end SupHPNot.exe and ProtectSvc.exe processes through Task Manager. You may do it one step at a time. First of all, stop SupHPNot.exe and then delete HPNotify.exe from XTab. Perform the same thing with ProtectSvc.exe (ProtectService.exe). If you see any other suspicious processes referred to other applications of XTab folder, do the same thing – stop their processes and delete related applications. Then you may delete the entire XTab folder and remove it even from the Recycle Bin of your computer. This is the way to remove XTab folder manually and for free. Only after doing so you may clean your browser from some particular browser hijacker that attacked it.
If you’re a regular PC user and don’t really know well about location of folders and registry entries in your computer then you have another option. You may remove XTab and all other related malware and browser hijackers by scanning your system with Plumbytes Anti-Malware, which is a powerful antimalware tool. It can delete all detected infections, not only those related to XTab. Note that this can be done with the help of its full registered version. Finally, you will need to reset your browsers with its help.
Below we’ve furnished you with a video guide at YouTube explaining manual (free) removal of XTab folder and its related components. If you cannot do it manually, please follow our automatic removal solution with the help of Plumbytes Anti-Malware antimalware tool.
Video explaining manual (free) removal of XTab folder:
Automatic tool to get id of XTab folder and related malware:

Detailed instructions to remove XTab and reset your browser settings automatically:
- Uninstall any suspicious programs from the Control Panel of your computer and remove any suspicious add-ons or extensions from your infected browsers (related to this hijacker).
- Via your browser download Plumbytes Anti-Malware via https://www.system-tips.net/download.php or directly via the download button above.
- Scan your system and delete all detected infected files and registry entries by clicking “Apply” at the end of scan.
- Important! Shut down all your infected browsers.
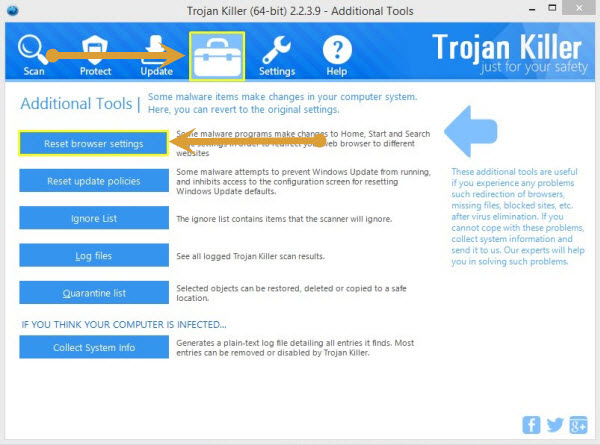
- In Plumbytes Anti-Malware click “Tools” tab and select “Reset browser settings“:
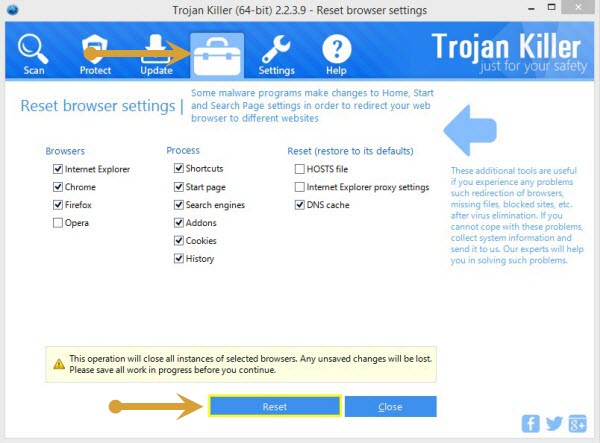
- Select which particular browsers you want to be reset and choose the reset options.
- Click on “Reset” button:
- You will receive the confirmation windows about browser settings reset successfully. When you reset your browsers through restarting them you will see that browser hijacker has been successfully removed.
- Finally, right-click the Desktop icons and Start menu items related to your hijacked browsers. Click “Properties” and check their destination path in the “Target” section of the shortcut tab. Make sure there’s nothing related to some particular browser hijacker in this destination path. If you see the site of some browser hijacker to be set there by default, remove it completely and leave only the clear destination path that leads to the executable of your browser.
Example of fixing the Desktop shortcuts and Start menu items related to your browser infected by this hijacker:
Additional removal tips for Mozilla Firefox browser (if the above-said steps didn’t help).
- Open your Mozilla Firefox browser.
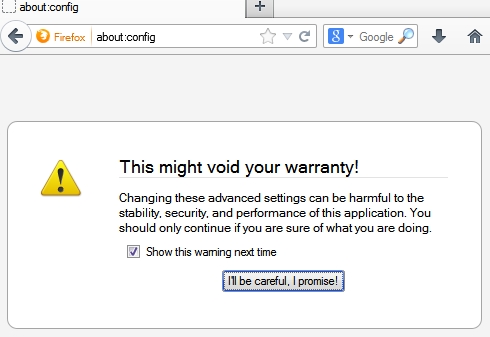
- Type “about:config” in the address bar and press “Enter” on your keyboard.
- Click “I’ll be careful, I promise!” button.
- This will reveal the Settings page of Mozilla Firefox browser.
- Type “Keyword.url” in the search box, then right-click and reset it.
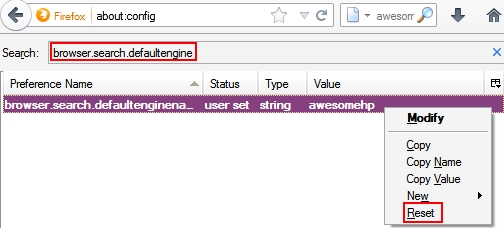
- Type “browser.search.defaultengine” in the search box, then right-click and reset it.
- Type “browser.search.selectedengine” in the search box, then right-click and reset it.
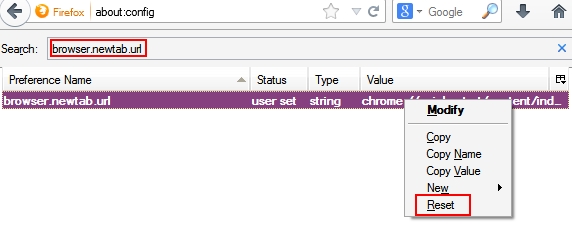
- Search for “browser.newtab.url“. Right-click and reset it. This is a very important step that will prevent the search page of this hijacker from opening in each new tab of your Firefox browser.
Comments are closed.